Running Wires for Surround Sound Speakers
When my friends start asking about adding surround sound speakers I get excited. But then they lament about running the wires, and I have to interject. It’s not as hard as it sounds, and there has never been a case where I haven’t been able to figure out a way to successfully execute running wires for surround sound speakers located in the back of a room. Some wiring jobs have been more difficult than others, but there’s always a solution if you apply some patience and enough effort.
The Three Basic Methods
There are many different ways for running wires for surround sound speakers, taking them from one part of a room to another. I’ve found that you can summarize the methods under three main categories:
- Running surround sound wires via baseboards and baseboard molding
- Wiring surround sound speakers through a crawlspace or attic access
- Running surround sound wires using crown molding
In every situation I’ve found myself, there never been a time where one of these three methods (or a combination of all three) didn’t allow me to get from point ‘A’ to point ‘B’ in a listening room. Obviously, wiring up a home in new construction is the best method of all, but that’s simply not where most of us find ourselves. I’ll give you some thoughts and pointers on each, and hopefully this will serve as a great guide in getting the wiring in place should you find yourself wanting to add surround speakers to your home.
Running Surround Sound Wires via Baseboards and Baseboard Molding
This really is the simplest way for running wires for surround sound speakers if you have a carpeted room, and you can get from one location to another without encountering a non-thresholded doorway. Even then there are options.
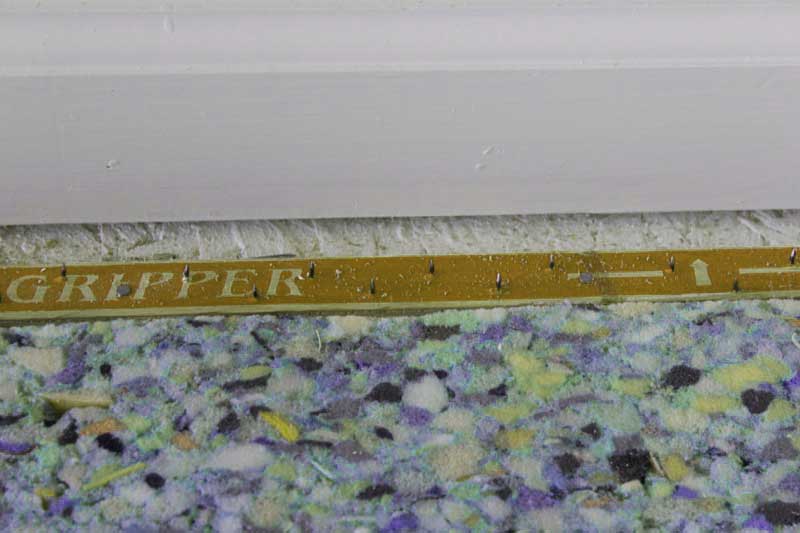
Carpets are laid down through the use of tack strips. These tack strips are typically laid a half-inch from the wall, giving you a nice channel behind them in which to lay wiring. Also, baseboard molding is typically installed slightly off the floor, leaving you yet another channel in which to tuck cabling.
Recommended tools: Pliers, screwdriver, razor knife, fish tape, tape measure, wire strippers
Steps to Installing Speaker Wire Under Baseboards
The basic steps to installing wiring using this method:
- Using a pair of pliers, pull up the carpet from the area just behind your AV gear where your speaker wiring will begin its journey.
- Note the gap between the carpet tack strip and the baseboard, and also note any gap underneath the baseboard molding as well. You can use this to hide your cabling and get it out of the way.
- Lay out your cabling—from your AV electronics all the way to your surround speakers. While some rare rooms may allow you to run cabling in two different directions to get to your surround speakers, it’s more likely that you’ll be running two pairs of cables all the way around. One pair of cables will then continue its journey to the second surround speaker.
- Use a pair of pliers to firmly grasp your carpeting and pull up approximately two linear feet to begin.
- As you tuck the cable into the gap between the baseboard and the tack strip, lay the carpet back down, making sure to be careful so that the sharp tack strips don’t puncture the wiring (or your fingers!) and create a short! As you lay down the carpet, pull up some more as you go. This will create a nice, continuous flow of work and it also will ensure you don’t need to re-stretch your carpet to get it back into place as you found it.
- When you get to the first surround speaker, allow the speaker wire to come out from the baseboard and run up the surround speaker stand to the speaker. If your surround speaker is wall-mountable, then (see our note below) drill a hole in the wall so that you can duck the speaker cable in there and run it up the wall cavity. You will likely have to use a fish tape to pull the speaker cable up and through the bottom hole and out the surround speaker hole.
- Continue the second surround speaker cable until you get to the second surround speaker. Do the above steps for that speaker as well.
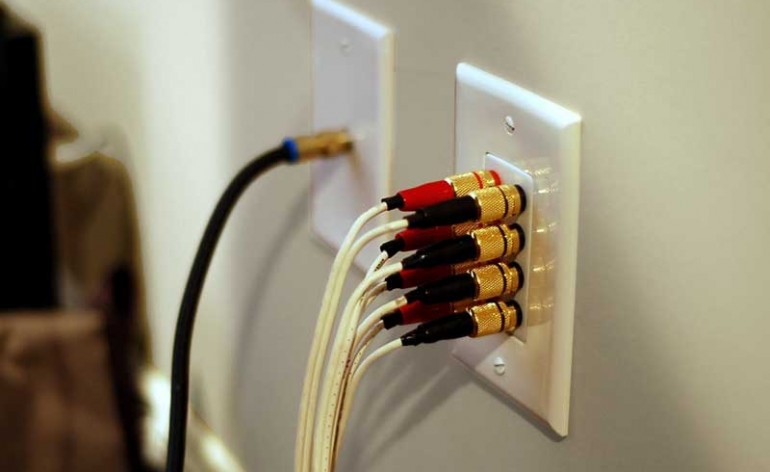
Baseboard Bonus: For an even cleaner look, consider installing a wall plate with speaker connectors at the back of your AV rack and at your surround speakers (if they are near a wall and on stands). Carefully drill a hole at the base of your wall behind your AV gear or speakers and run the wire up—connecting it to the back of your speaker connector wall plate. Now you’ll have a completely finished look that is much nicer than having speaker wiring simply duck into the carpet at the baseboard. This is how a pro would finish off the job, and there’s no reason you can’t too.
Running Wires for Surround Sound Speakers Using Crawlspace or Attic Access
When running surround sound wiring in your attic or crawlspace you may need to consult an electrician in your area (we can’t tell you what’s legal or permitted in your local municipality). Assuming you’re good to go, however, this method is often made more or less difficult based on the location of the speakers in relation to interior or exterior walls.
For attic access, interior walls are easiest, while exterior walls are simpler for crawlspace access. The concepts are the same, however. You are essentially running your wiring either up or down a wall from one location to another. The tricky part will always be knowing where you are and finding the correct wall cavity. But I have some tricks for that as well.
Recommended tools: Cordless drill, 1/2″ wood drill bit, flashlight/headlamp, stud finder, razor knife, fish tape, tape measure, wire strippers, metal coat hanger or piece of 12 gauge wire, screwdriver, hammer, single-gang low voltage box(es), wire staples
Steps to Running Speaker Wire in Crawlspace or Attics
The essential steps to running surround sound speaker wires using this method:
- Plan your cable route. You want the easiest route, so check out your attic or crawl space (or both) to see which method will be easiest. What’s nice about this method is that you can literally go from any place to any other place provided you have the access and the right tools for the job.
- Once you know which way you’ll be going, locate the wall cavity behind your AV gear. If there is an outlet on that wall (and there likely is) then you will have a basis for reference when you get to the attic or the crawlspace. Look for the emerging power cable and then measure over accordingly to get to the wall cavity you require. Use a stud finder on the wall below to determine how far over from the power outlet you need to go in order to hit an open wall cavity. Whenever possible, avoid running your speaker wire in the same wall cavity as power lines (this actually violates several building codes).
- Cut out a single-gang low voltage box hole in the wall behind your AV gear. Typically these are 18-inches off the floor, but try and match the height of the nearest outlet box so it looks uniform.
- Remember that you’re connecting the dots—that’s all. Next, you want to go into the attic or underneath into the crawlspace and drill upwards where you determined the wall cavity space to be. It helps to use a partner in this. In the event that you start to come through where you shouldn’t, you can often hear exactly where the drill bit will emerge before it gets there. I have saved countless hours and hassle by having a friend tell me I was drilling in the wrong location.
Quick Tip: Drill and poke a coat hanger or similar wire up from below to quickly and easily identify the proper location from within the attic (you’ll see the wire poking up through the insulation and avoid a lot of hassle.) - Repeat this attic/crawlspace process for each surround speaker location. For stand-mounted surrounds, you’ll want a wall-mounted plate for your speaker connectors at the approximately 18-inch height. For wall-mounted surrounds or in-ceiling surrounds, you’ll likely want to wire the speaker up directly with no wall plate.
- Run your wiring from point to point, using fish tape when needed to get it up through the attic or crawlspace hole and on to the next location. In the attic or crawlspace, always secure your wire using wire staples and a hammer. You don’t want the wire to dangle, as it can become a hazard or even get severed by mistake during a future renovation or repair.
- Terminate the speaker cable into the plates or speakers as desired.
Running Surround Sound Wires Using Crown Moulding
This is perhaps my favorite method, mostly because you also get some nice crown in the deal! It involves more work than the other methods, but it’s immensely rewarding, and it just might convince your other half to go for a surround sound system. (She’ll get crown molding out of the deal!)
A lot of the principles learned in the first two methods apply here as well, with the big exception that you are using the ceiling to circumnavigate the room with your speaker wire. It’s a solution I first tried back in 2008, and it’s been a staple of my recommendations-list ever since. Be warned, crown molding without speaker wires is difficult enough to install if you haven’t done it before.

Recommended tools: Miter saw, cordless drill, 1″ wood drill bit, stud finder, razor knife, fish tape, tape measure, wire strippers, screwdriver, hammer, single-gang low voltage box(es), wire staples
Steps for Running Wires Behind Crown Molding
While we won’t go into the details of installing the molding, here are the steps to placing wire behind it.
- Install 1×2 furring strips on the wall around the perimeter of the room. You will tuck the cabling above this piece of wood and it will also serve as a solid anchor point for the crown molding. I have seen people simply fish loose wire behind the crown molding. However, I find our method to be more secure and permanent. Hint: Use a test piece of 1×2 and a scrap piece of molding to determine the exact height you should install the furring strips at along the wall. In my installation, the strip was spaced about 0.75″ from the ceiling. Provide a 2- to 3-inch break between strips at each place you’ll need to access the cable from the wall.
- Again, plan how you want to run your cable. You want the simplest, most direct route. Typically, that means going straight up the wall from behind your AV gear and straight down the wall for each surround speaker. I tend to run the surrounds together rather than splitting them apart, even if it means using a tad more cable. It’s simply easiest to do it all at once as opposed to running two completely separate lines.
- Cut out a single-gang low voltage box hole in the wall behind your AV gear and cut out a 1-inch square at the ceiling. Use a fish tape to get two pairs of speaker wire run from the low voltage box up the wall and out the 1-inch access hole.
- Route both pairs of speaker wire around the room, securing it to the top of the furring strips. Stop when you get to the first surround speaker.
- Cut a 1-inch square at the ceiling at the location for the first surround speaker. For stand-mounted surrounds, you’ll want a wall-mounted plate for your speaker connectors at approximately 18-inches from the floor. For wall-mounted surrounds, you’ll likely want to cut another hole where the speaker will be mounted. Consult your speaker’s user manual to understand the preferred wall-mounting method. For an in-ceiling surround speaker, locate where the speaker will be mounted and cut out the hole for the speaker using the template. Be mindful of where the ceiling joists are located.
- Fish the first pair of speaker wire as needed to get to the first surround speaker.
- Continue on to the second speaker location and repeat Step 5.
- Terminate the speaker cable into the plates or speakers as desired.
- Attach and install your crown molding. Caulk, paint, and enjoy!
Conclusion
While all of these methods will work, sometimes you need a combination of each to get your speakers and your wiring where it’s needed. In any case, the crown moulding solution has convinced more than one wife to allow surround sound speakers in her living room due to the added benefit of getting the moulding installed.
Just be careful as you might end up having to install it in other rooms as well!
Have you utilized the crown molding method for installing surround speakers? How did it go? Let us know in the comments below.


2 surround
4 Dolby Atmos
2 Zone 2
Monoprice 12AWG oxygen free copper CL2 rated in wall cables.
GLS Audio Save connect gold banana plugs (Orange Count Speaker).
You’re making us jealous!
For zone 2: Up the wall, over to the unfinished basement, up a PVC pipe 2 floors into the attic, down into one closet wall to the 1st floor ceiling.Read more…
Wow, I can’t imagine having all the drops coming into to a single wall plate. I did a speaker/sub combo for FR and FL as shown, then individual drops for the other 5 speakers.Read more…
If I had new construction I would do this. Not so much with an old house. I would need professionals to install it.
2×6 wall with an open 2×4 wall behind
Thank you so much for the instructions using he baseboards and carpet. I live in an apartment where I can’t go crazy and open up holes in the wall or ceiling, but I figure that I can hide wiring along the floor. I already have my speakers, but since I wasn’t sure yet what setup I was going to use, I haven’t bought the wiring yet. As soon as I do, I’ll finally have a system good enough for watching a movie even when my roommates aren’t being quiet in the kitchen.
Helen | Raymar Electrical SalesRaymar Electrical Sales
Whoa! Crown Molding done right is way beyond most homeowner’s ability range – takes a true carpenter who knows how to do all kinds of specialized, angled cutting, with power saws and tools. To attach it right so that the nails aren’t visible takes a high powered airgun which takes specialized finishing nails and some training on how to use the gun. A crown molding project including tools and materials therfore, would be quite an expense. So to even suggest that this is a doable project for the regular guy in an article about installing surround speakers is very misleading and totally unrealistic. More applicable to your article would be running wire through crown molding which is already there.
I think your statement would be 100% dead-on for hardwood crown, but for painted molding I think many DIYers are more than equipped to tackle it.
ah right, 10/4.
Regarding the image: “Running wires behind crown moulding”, I would strongly advise consulting with your insurance company. What’s been done in the picture is: breaching of a fire barrier, not using a new work box, and presumably not using a wall plate. While folks often believe the NEC doesn’t apply to “low voltage”, each of these things are (in most jurisdictions) fire code violations. In event of fire, which in all likelihood is unrelated to this work, the fire will have a way to get into the walls (or supply more oxygen to a fire which breached the drywall) and spread faster, leading to higher damages. All wires – even low voltage – must also be “in wall rated” (but don’t have to be the more expensive “plenium/HVAC rated type). Fortunately, almost all bulk wire will be in-wall rated.
I’m a DIY’er and I’m not trying to sound discouraging. It’s only another 20% work to do the research and mimic what professionals do.
What about using crown moulding designed for cable management – ie Raceway or Crownduit?
How do you handle when you have doors in the pathway? In my case, I have a closet on one side of my audio system and double doors to my (upstairs) office on the other side. I can’t do crown molding because the ceilings slope from about 16 feet near the AVR to 10 feet on the other side of the room. I installed under the carpeting but didn’t know the best way to fish it and wound up with noticeable cuts near each door frame and lumps in the carpet. And scratched hands.
Sounds like running a channel around the doorframe is about your only solution in that case.
Yamaha receiver system speaker ceiling wireless network 6 ceiling speaker two story home
Great design idea and tips. Thank you for clear instructions. This is worth reading, I’ll be sure to share this with other homeowners that would want to have a surround sound sysyem.