Help! I Damaged My Speaker Driver
Maybe it was a curious child. Maybe it was a thoughtless wrong step. You could have bought used speakers and hoped they were in perfect working order. Regardless, you have noticed that there is some damage to your speaker driver. Cabinet damage is less worrisome. It may look bad, but if the cabinet is still intact, it will work just fine. But when a driver is damaged, it can often not be readily apparent what, if anything, you should do.
Author’s Note: When dealing with a damaged component, no matter if it is a driver, amp, speaker, receiver, etc., you’ll want to contact the manufacturer first thing. If you are still under warranty, and sometimes even if you aren’t, they are the best source for help. At the minimum, they can offer some suggestions. They may even offer replacement parts. So reach out to them before you try to DIY any repair. You could save yourself some time and headache.
Do Nothing
Your first, and often best, option is to do nothing. Cosmetic damage to a speaker driver can often make no sonic difference in the speaker’s performance. If you have been using the speaker and didn’t notice the driver was damaged until recently, you are probably better off leaving it alone. If you hadn’t noticed it, it isn’t making enough of a sonic difference to affect your life. Walk away.
But you won’t, will you? You have to know if the sound of your speaker is affected by the damage. Well, to start, download a sweep from AudioCheck.net. Run that sweep through your speaker. Do you hear any inconsistencies or buzzing? No? Walk away. The damage to your speaker isn’t making a sonic difference. If you aren’t sure, compare it to one of the other speakers in your room. But if you hear something, or just want to fix the damage, read on.
Dented Tweeter
Who hasn’t seen a pushed-in tweeter in their lives? I know I have. There is something about the soft-dome tweeter that just beckons little fingers to push them in. But that’s not the only way they can be damaged. Tweeters are by definition very light and therefore easy to damage. A bit of a dent takes almost no pressure. While most experts will tell you that a dent or two (even a pushed-in tweeter) won’t make much of a sonic difference, you may still want to fix it.
We’ve seen lots of solutions out there. Sucking on the tweeter is one of the least effective and grossest. We’ve seen suggestions to push on the tweeter in different areas to get the dented area to pop back out. Our favorite solution is to use painter’s tape. Painter’s tape is designed not to leave behind a residue. Wrapping some around your hand and then lightly placing some on the dent could give you enough grip to pull the dent out. Don’t expect this to work on the first try. It’ll take some doing. But don’t get impatient. If you push too hard on the tape, you could further damage the tweeter. Take it slow. It isn’t worth risking further damage.
If you find that the painter’s tape isn’t strong enough, try scotch or even duct tape. These might leave a residue behind, but it is better than all the other options. Lastly, don’t worry about getting the tweeter perfectly smooth again. As long as the major dents are removed, normal listening should fix any remaining dimples.
If you are dealing with a metal dome tweeter, contact your manufacturer about how to disassemble the tweeter housing. This should give you access to the back of the tweeter. Pushing on the back of the tweeter with something soft that won’t leave a residue (like a Q-tip) should get it back in place safely. Again, any dimples or marks should either work themselves out or not make any sonic difference.
Dented Woofer
A dented woofer driver is less common than a tweeter in a speaker. In both cases, however, these cosmetic damages are unlikely to affect how the speaker actually performs. Run your sweeps and hope that you don’t hear any problems. Because you can’t really do anything about a dented woofer when it is the actual cone material. There is no way to reinforce the cone. But if it is the center of the woofer, that is a different story.
The center of the woofer is called the dust cap. This does exactly what it says and keeps dust out of the driver internals. A dent here shouldn’t make a sonic difference. If you search online, you’ll see lots of suggestions. Anything that recommends a needle is a terrible idea as it absolutely allows dust in and will eventually damage your driver. We also don’t like the solutions that include super glue or other adhesives that are left behind.

Again, the tape solution is the best here. As the surface area is much larger, you need to experiment with different tapes to see what is strong enough to pull the dust cap free. This sort of speaker damage shouldn’t be audible so don’t risk further damage to the driver to fix it. Lastly, if it is a bass driver, you have a fun option to try. Play something LOUD in the range that will be played by that driver. The internal pressure of the air may push the dust cap back in place. Might not work but it is a great excuse to play something loud!
Author’s Note: You may have read solutions that involve vacuum cleaners. Be VERY careful with such solutions. While these can work, they risk serious damage to the driver and making the speaker completely unusable. We NEVER recommend something so strong and highly advise that you don’t use such solutions.
Torn Surround
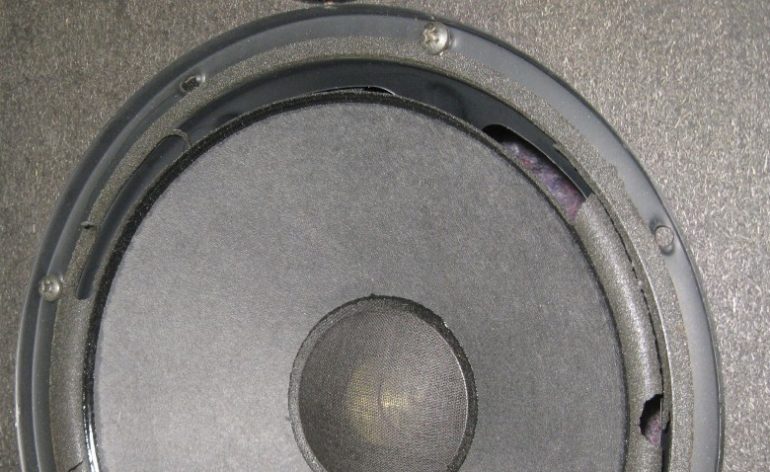
The surround of a driver is the rubber suspension that is attached to the cone. It allows the cone to move in and out properly. A torn surround is not something you can ignore. You’ll hear a buzzing as air rushes in and out of the hole in the surround. If your speaker driver has a torn surround, you have to fix the damage.
Fortunately, there are aftermarket surround replacement kits you can buy. They take a little DIY confidence, but there are lots of tutorials out there. The first step would be to contact your speaker manufacturer and describe the damage to the driver. They should be able to suggest the proper kit that will work for your driver. If you own a mass-market speaker, a simple Internet search will do the same thing. Buy the kit, replace the surround, and everything should work as before.
If you are looking for a repair option, there aren’t a lot of good ones. We’ve heard that rubber cement or fabric glue can work. You’ll need to apply it to both sides of the tear and it works best if the tear is small. Just make sure to use as little glue as possible and smooth the edges of the tear together for a seamless fix. The glue must remain flexible after drying for this fix to work.
Torn Woofer/Tweeter
If your tweeter is torn, it is time to start shopping for new speakers. There really isn’t much you can do. If you are in love with your speakers, you can contact the manufacturer and see if they can send you a replacement. Just be prepared to replace tweeters in any matched speakers. Tweeters usually have slight differences between batches and most manufactures will want you to replace any matching tweeters so that you still have timbre matching across all the speakers.
If the tear is in the woofer cone, you have some other options. You could try a bit of paper towel or tissue paper along with thinned glue. This acts as sort of a bandage. The paper should just barely cover the tear and you’ll need to either soak or completely cover the paper with the glue. This is one time when you don’t need to use flexible glue. The cone isn’t supposed to flex so stiffer glue is preferable. We’ve even heard of using Elmer’s Glue to good effect.
Conclusion
If you’ve damaged your speaker driver, you may be looking at a replacement or a repair. Most of the time, however, you can play a few sweeps to ensure that the damage isn’t affecting how the speaker sounds. If you do end up needing a fix, we’ve got lots of suggestions for you. Have you repaired a damaged driver in a speaker before? What did you do and how did it work out? Let us know in the comments below!


