
Room Acoustics for Home Theater
Possibly one of the most confusing aspects of setting up a home theater is dealing with room acoustics. Every room has acoustics—that’s simply a word used to describe what happens when audio is produced (or reproduced) in the room. Room acoustics are more or less the audio character or signature of your room. Some rooms are highly reflective while others (less common) are dampened. Dealing with room acoustics for home theater means that you are attempting to correct for ways in which your room might accentuate or reduce only certain frequencies, causing uneven frequency response at the listening positions. A great audio system will sound terrible in a room with bad acoustics. A bad audio system will sound…well, it will still sound bad ina room with good room acoustics—but that’s besides the point. Let’s start with some basic room acoustics definitions.
Practical Room Acoustics
First off, if you need any help understanding the terminology that is clearly going to creep up in this article, be sure to bookmark our page on Glossary of Home Theater Terms. Aside from that, my intention is to give you some very basic steps towards achieving good room acoustics for home theater. This will differ somewhat from room acoustics for recording studios as they often take a completely different approach. Before you start, you’ll need to get a handle on what you’re dealing with. For that, we recommend forming a relationship with a room acoustics supplier or anyone else who will help you evaluate your room. Some of those companies include: Auralex Acoustics and GIK Acoustics or you can go it alone and monitor reverb time and frequency response and make changes based on best practices combined with a computer-based recording system that will help you evaluate your room in real-time.
Find the peaks and troughs for bass in your room.
These are the room modes (peaks) and nodes (dips). You can do this the hard way—by crawling around for bass frequencies—or you can use fancier calculators to break down the math and decide on the best place for your couch, seats, and your subwoofer. Your best option is to have the majority of your seats in a null position—a part of the room that isn’t in either a mode or a node.[/alert]
There are too many systems and too much complexity to teach how to properly evaluate for room acoustics in a single post, but let’s get you pointed in the right direction so you can begin to understand what to listen and measure for and then how to respond to what you learn about your room (since that is both the method and the goal we’re after). Some good pieces of software you can use include: Room EQ Wizard (Mac/Windows), Fuzz Measure (Mac), Room Tools (Windows), and RPlusD (Windows).
Practical room acoustics are those adjustments and manipulations to a room which:
- Don’t require a ton of money to implement
- Make sense in a home or residential environment
- Use as many natural solutions as possible before turning to custom products
- Take into account your existing equipment and any desired future purchases
- Adapt to your lifestyle and aesthetics
- Known when “enough is enough” (I call this the “good enough” factor)
Room Acoustics Don’t Have to Require a Ton of Money
You can get started in room acoustics for home theater simply by measuring what you already have. Download one of the pieces of software above and use a microphone that has a calibration file. Without going too far into it, there are low-cost kits you can purchase for under $100, but a little-known secret is that even a simple $40 radio shack SPL meter will include an RCA output that can connect it to any outboard USB audio device. With any microphone, you can get at least basic, fairly accurate readings in your room. Where the mics differ most is above 10 kHz where you won’t be doing many treatments regardless.
Tip 2
Always start with bass and then work towards your speakers. After you set basic levels, you want to get good, even bass response. Having peaky bass means that everything else is getting thrown off as well. It’s a domino effect that can really make a theater room sound muddy and unimpressive.Once you understand where you need to apply diffusion and where some issues with bass modes and nodes are occurring, you can begin to experiment. Dampening early reflections from the floor and side walls is a good place to start, but not before you start crawling around for bass to optimize your subwoofer placement for best bass reproduction. Once that’s done you can look at your next options.
Room Acoustics Should Make Sense in a Home or Residence
Covering all your walls in custom diffusers doesn’t make much sense. Unless you have a dedicated home theater, you’ll want to use some restraint and ensure you’re using materials that don’t disrupt the aesthetics of your home. There’s nothing worse than coming into a nice home and seeing random panels strewn about the room in an effort to somehow optimize the audio in a home theater. It comes across as lazy—and you want your home to look nice while you enjoy great home theater surround sound and music. Several tips and tricks for acoustics in home theater rooms can be had simply by using what’s available.
Use as Many Natural Solutions as Possible
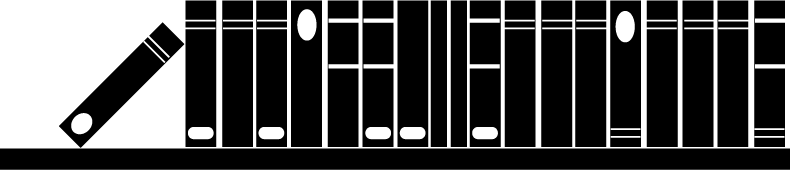
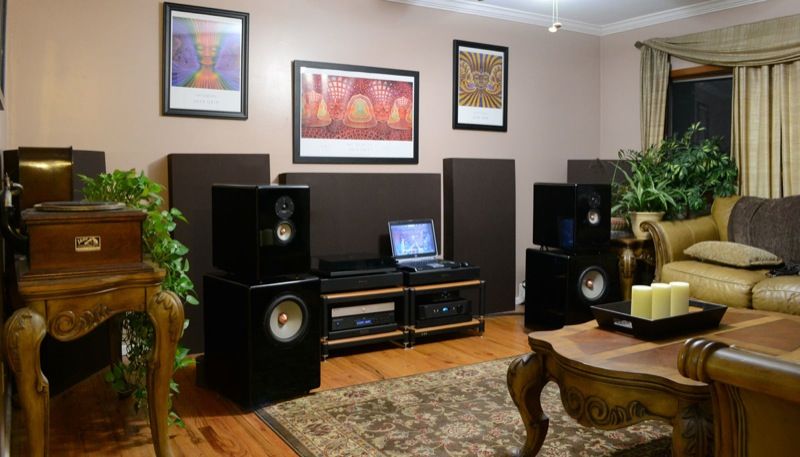
When you’re attempting to correct for the effects shown in your room analysis software, be sure to use as many natural solutions as possible. A bookshelf can be a great diffuser, but only if the books are sufficiently randomized. If you have them perfectly stacked vertically in alphabetical order, chances are you’re not going to get much diffusion.

For handling floor-initiated early reflections, a nice throw rug with carpet padding underneath will do wonders down to around 300-400Hz. While it goes that low, the important thing is that dialogue will clear up from your center channel since it will be reaching your ears in a less cluttered, more direct, manner. Aside from that, curtains can help provide additional absorption and cloth-based furniture will serve to lower overall bass frequencies.
After you’ve done the natural stuff, feel free to build or purchase your own panels. The thicker the panel, the lower down it will “scrub” (remove) frequencies from the room. And here’s a tip: If you place a 1″ panel so that it is spaced 1″ away from the wall, it has the net effect of a 2″ panel mounted flush to the wall. Similarly, a 2″ panel placed 2″ off the wall has the net effect of a 4″ thick panel mounted flush.
Take into Account your Existing Equipment
Some AV receivers have decent room correction software built right in. Once you get as many environmental changes taken care of, THEN you can move into the realm of DSP solutions to finish the job. Make sure that you’ve positioned your subwoofer and eliminated any major peaks and dips as well as any issues with dialogue intelligibility. Then you can use systems like Audyssey MultEQ XT to take an included microphone and EQ the audio to compensate further for things that you may not be able to treat.
Adapt to Your Lifestyle and Aesthetics
Take some of the above elements into account when modeling your room for better sound reproduction. A combination of natural and custom panels can really make a room pop—and they don’t have to make your living room look like a studio (or a Frankenstein dungeon).
Know When “Enough is Enough”
The last thing we’ll say is that you should know when to stop. While some people (usually single males) may want to continue experimenting forever with room acoustics for home theater and stereo listening, there is a point at which the gains might be outweighed by the hassle. If you can get your room 80% of the way there, then the minor tweaks you make later don’t necessarily mean you have to overhaul the entire system.
Hopefully, this guide was helpful. You really can do this on your own, and there’s no reason why a small amount of money up front can’t end up making your listening environment very theater-like. Movies, after all, should be just as enjoyable at home—or more so—than at the theater. (Plus, there’s no gum under your feet and the snacks are cheaper!)


