Wiring for Whole House Distributed Audio
I’ve got a brother-in-law who’s building a house. He was asking me about many different things having to do with wiring up the home, but one question, in particular, had to do with integrating a whole-house distributed audio system. This isn’t the first time I’ve been asked about wiring up a home for sound, and it’s likely to not be the last. Whole house audio systems are a big deal, and they are certainly one of the more exciting aspects of thinking about the functionality and use of your home during the pre-construction phase. Wiring your audio correctly, and with a mind on the future possibilities, is a big part of that consideration.
And let me be clear—asking about whole-house audio is typically a loaded question. Whole-house distributed audio can mean many things to many people. I think the best way I’ve found to give advice that’s meaningful has always started with asking the right questions. Questions like What’s your budget? How will you use the system? How big is the home? How flexible does the system need to be? and Do you want the minimum, or are you looking for the very best in performance, features, and stability?
Once you answer those questions you can begin to have a better grasp of the details that will be in this article. When wiring up an entire home for audio you really run into one of several possible configurations. While the possibilities are nearly endless, you can nail down a few basic configurations to summarize the options. Before you move on, however, get the answers to the questions above so you can carry them with you as you investigate the possibilities below.
Speaker Selector Switches With or Without Integrated Volume Controls
This type of configuration is essentially a distributed audio system consisting of a source component running through an amplifier and then sent to a speaker selector box. That selector box is really a distribution system that’s just smart enough to know how to keep your amplifier from blowing up. It does this by impedance-matching the system to deliver no less than a 4-ohm load to the amp. If the system didn’t do this, then adding four or more speakers to an amplifier would drop the impedance seen by the amplifier(s) to less than 2-ohms. That will fry just about any amplifier or AV receiver over a relatively short period of time.
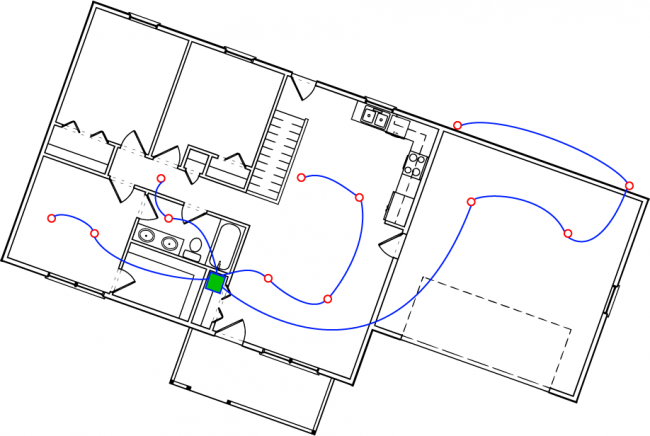

Speaker selector switches can simply split the signal to a bunch of speakers, or they can also provide volume control for each output pair. Volume control is particularly good when each speaker or speaker pair won’t produce the same level of volume per input. This could be due to using a different speaker in each zone or simply because of the acoustical differences from one speaker placement to another. (Think of a speaker in a small bathroom compared to the same speaker in a large room.)
This is, by far, the most basic of whole-house distributed audio systems, and it’s best for those who don’t plan on a multitude of sources and who are mostly concerned with getting moderately tame amounts of audio throughout a home for ambient music during get-togethers. If you want to route a particular audio source to one or more specific rooms, or if you want to have more real-time control over the volume of the audio in the room while you’re listening, then you’ll want a more sophisticated solution.
Localizing Volume Control in the Room
The next step up in whole-house distributed audio complexity comes when you begin to add passive volume controls to each room in the home that has speakers. This allows you to control the volume right in the room you’re in without having to run back to an equipment closet or without having to adjust the output levels in the rest of the home.
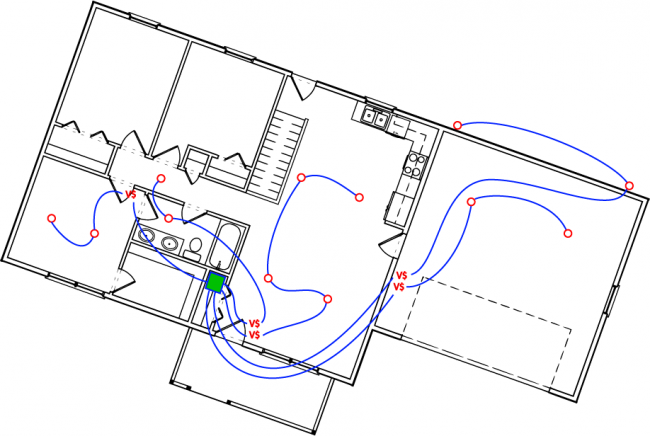
The additional complexity here comes from the fact that you now have to run your speaker cables to a volume control in the wall before passing through to the speaker in the ceiling or other location. This not only involves more speaker wire, but it also increases the installation complexity since you’re now running wiring down your walls. You also have to be very aware of your building codes to be sure you’re in compliance when running this type of cabling in your walls—particularly when you’re doing retro work in a building that is already constructed. Running wiring in a new home is one thing, but adding it in after the fact may involve more issues with properly securing the cables to your interior wall studs.
The advantage to a system like this is that you’ll be able to directly control the volume of the audio in the room you’re in simply by turning a dial or sliding a switch on a nearby wall plate. The disadvantage is that it’s not a terribly “smart” system. You have to visit each room to adjust the volume and there aren’t many configurations like this that can interface with a smart app or another method of bringing up the IQ of the speakers in your house. One advanced function you can do with a system like this is utilizing volume controls with built-in IR receivers that can be routed back to your equipment closet. With this, you at least have the opportunity to use a remote control to change an input source if needed, without having to run back to your AV closet.
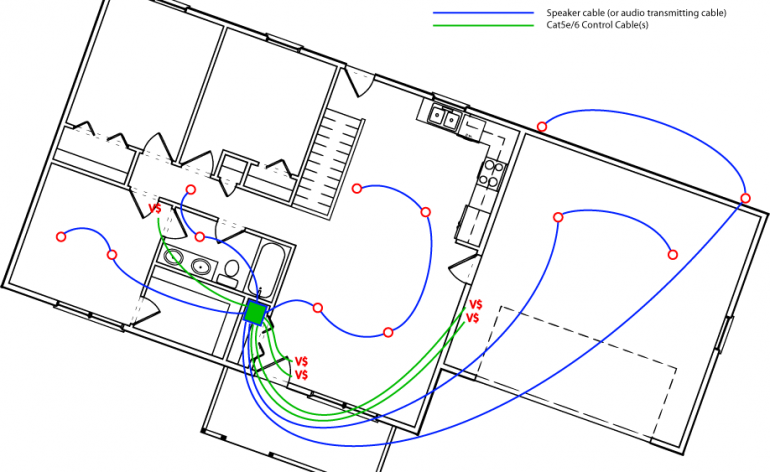
Utilizing a Smart Control System
This last option is the beginning of what most custom installers consider “true” whole house distributed audio. The use of a low voltage control system means that you are running your powered audio lines directly to your speakers, but you are controlling those speakers using low voltage cables which are wired to local “smart” digital control switches within the room. This is a much more intelligent system, and it allows you to centrally control your entire home from a touchscreen app or other centralized interface while still maintaining the ability to control each room independently. The difference is when you adjust the volume in a room, the system recognizes what’s going on and there is some form of two-way communication.
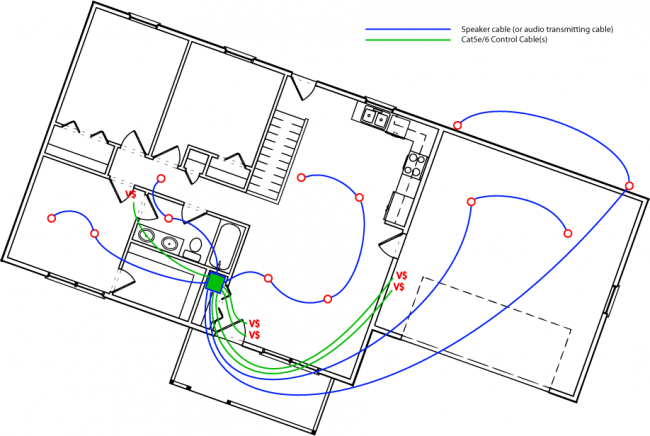
The other huge difference is that a control system allows you the opportunity to also change the source from within the room. Since it uses low voltage to communicate with the central hub, that central hub can be told to switch to a different input source or route audio from one location to another as needed. This type of system is very powerful and is typically powered by the low voltage control cable (typically one or two Cat5e/6 wires).
As you can imagine, the sky’s the limit with systems like this as they can involve color touchscreen control panels and also involve the use of WiFi and apps to provide even more control. Some systems are getting extremely smart and are introducing the concept of IP-addressable speakers, whereby each speaker in your home is now able to be assigned sources and controlled independently within your whole home audio system.
Regardless of which method you choose, just be sure to plan out your needs, and ensure you have the ability to run the required cabling to both the speakers and/or the volume control locations around your home. Whole home distributed audio is very cool, and it’s a great way to facilitate great audio for parties or even when your outside or in your bedroom or workshop. For those about to embark upon this adventure, we’re a bit jealous—it’s a lot of fun!


I have a Russound CAV6.6. I haven’t had it installed since 2010. Now I am in the process of doing basically a whole house renovation. The walls are open, and I’ve had the electrician run wires and CAT6 throughout the house, leading to one large closet. I have a few questions concerning how to bring the old CAV into the new era of technology. Including the use of apps, instead of wall mounted key pads. Also my question is how do I get 22 speakers to work with my Russound CAV6.6?
Reading many of your articles leads me to think I may need to get a speaker switch selector? I’m not sure however if I need that as I have the multi zone Russound controller?
Also can I replace the wall Keypads with Tablets or apps to use as volume and source controllers?
I’m not technologically savvy, but I would like to rehook up the old system, using today’s technology.
Thanks for any assistance or support.
I also have a 300 disc CD player, and Denon Receiver, DVD/Blu Ray player I want to connect to the Russound as well…
Is it ok to loop the speakers per zone as shown in the above diagram? Is there any loss in sound quality?
I know this is late, but you have to be careful when looping wires on an 8ohm setup. If you chain two 8ohm speakers together, the rating is reduced to 4ohms. The amplifier will be rated or listed as “stable to 4ohms” or something like it. If you reduce the resistance below that you risk damage or overheating. Also if you loop speakers together that are on the left channel you won’t have stereo sound. Now if you’re talking a 70v system, that’s a whole different thing.
Hello!
Great write up. I am building my home and want to put in a basic in-ceiling audio system for music. If possible, I do not plan on having volume switches in any room. That said, do they make speaker selector boxes that allow you to change volume for each speaker pair using a phone or tablet?
Hi, I recently bought an Onkyo NR696 receiver and a Pyle multi room 6 channel speaker selector switch with individual volume controls and A B buttons. I wanted to upgrade my old receiver and switch selector. I have 4 rooms with in ceiling speakers 8 ohms and 16 AWG wire coming out of living room wall. I hooked up all 4 speaker sets to left and right channels using banana plugs, to the back of the switch. Then I connected two separate 16 AWG speaker wires (with banana plugs) to left + – channel and right channel + – on back of speaker selector that reads (input A AMP) and connected the other ends of the wires respectively to receiver that is marked Zone 2. I then went into the setup menu on the Onkyo receiver and turned on Zone 2. The receiver illuminates the Z2 icon and flips the main living room speakers from 7.1 to 5.1. I turned volume controls up on both components and toggled the A and B switch on front of selector, and no sound is detected in any of the speakers. Is the speaker selector considered an analogue component? Should I be using the Line Out Zone 2 on the Onkyo receiver with an external amplifier as to make the speaker selector fire up my speakers? I even hooked up my old speaker selector to troubleshoot and again, no audio was detected 🙁 I am so puzzled why my speakers are not working, as this is such a simplistic setup that I’m familiar with from my old receiver and speaker selector. Thanks in advance and any advice would be greatly appreciated to troubleshoot this issue. Thank you for a wonderful audio/video breakdown!
If you hooked up your old switch and still didn’t hear anything, the problem is with the Onkyo. It sounds like you hooked everything up correctly. You’ll need to check that the source you are using can be output to Zone 2 (if it is digital, it might not) and that the volume for Zone 2 is turned up. Otherwise, it sounds like you have everything connected correctly.