Zoom H6 Handy Recorder Review
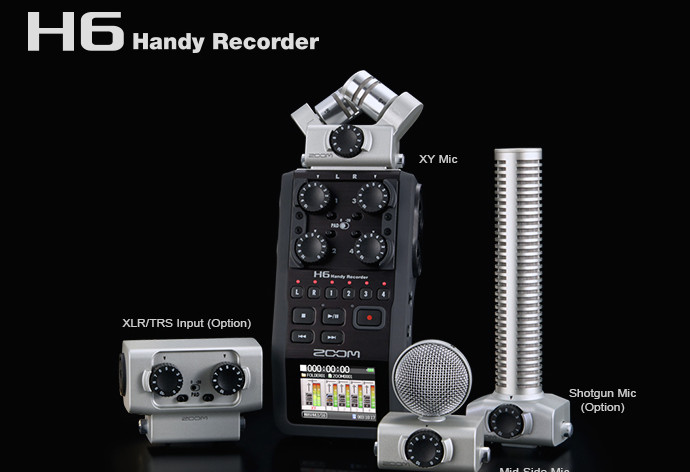
I’m very familiar with Zoom, having used their H4n for recording field audio on some independent films and film shorts in the past. In each case I came away impressed with how easy these little “Handy” recorders were to use. When I got the opportunity to check out the Zoom H6 Handy Recorder, I jumped. Here was a portable field recorder with four interchangeable input capsules and support for almost any input source or microphone configuration possible. The Zoom H6 recorder can be fitted with an X/Y, MS (middle sides), or shotgun microphone, or you can add an additional pair of XLR/TRS combo inputs. This ridiculously cool amount of customization plus the dynamic range of this product make it the perfect tool for field recording that we’re aware of. It used to be that portable recorders at this price were for low-budget use. More and more, however, we’re seeing people jump into these systems for higher budget projects in lieu of more expensive models.
Zoom H6 Handy Recorder Overview and Uses
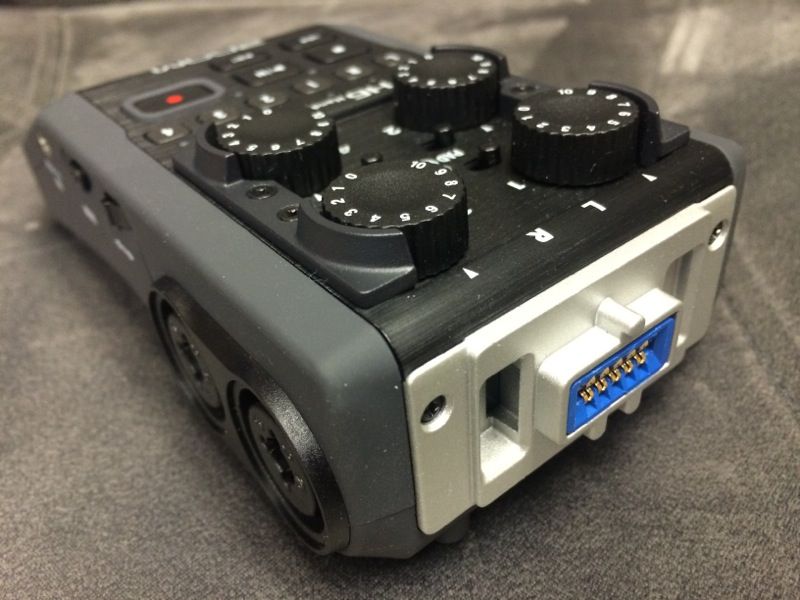
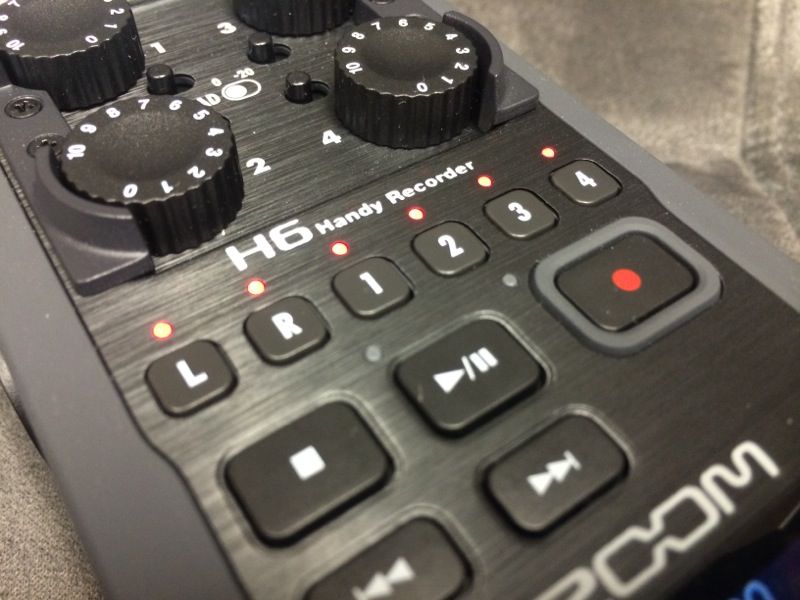
 I mentioned field recording above, but truly the Zoom H6 can support nearly any type of live recording, broadcast or even on-set or on-site film or video recording so long as you don’t require more than 6 channels of input. Because of the built-in processing power, something that was impossible a few years ago is now easily accomplished without any dropouts, skips, or glitches. It’s important to know that the H6 has four primary inputs that can take either 1/4″ TRS (balanced tip ring sleeve or unbalanced tip ring) or balanced XLR inputs. On top of that, two more inputs can be accessed using the top-mounted capsule system. This can be the X/Y mic, the MS (middle sides) mic, shotgun mic, or two more XLR/TRS combo inputs (for a total of three stereo recording channels or any combination up to 6 mono tracks). If you need to feed a line level to the recorder, the included X/Y microphone capsule (XYH-6) gives you a stereo 1/8″ input that automatically mutes the mic when used. Both microphone (+6) and line-level (-10) signals are possible on the XLR/TRS combo inputs via automatic internal switching contacts. For setting your levels, the inputs all have independent level controls and the dual inputs jacks each feature a -20dB pad for high-level signals. This pad is also present on the optional stereo XLR capsule. The preamps on the Zoom H6 Handy Recorder also allow for up to 5V of input so even high level inputs won’t distort. When you want to get out of the Zoom H6, the unbalanced stereo 1/8″ line out is right at the bottom of the recorder underneath the LCD display. The H6’s internal mixer even allows you to set what comes out of that jack.
Handy Options
There are a lot of features and options on the H6, but a few stand out. First, phantom power is provided for when you want to use a condenser mic—just activate it in the easy-to-use menu system. Phantom power can be set to 12, 24, or 48 volts in the menu depending upon what you require. A side-mounted USB port on the Zoom H6 Handy Recorder means that you can actually use it as an external audio interface. The H6 also gives you control over the headphone output with a hard volume control. Also, should you need to play something back and check it quickly, an integrated speaker on the bottom lets you do that without even having to connect a pair of headphones. You won’t get the fidelity you might want, but when you’re just checking for whether or not a file got recorded, or perhaps searching for a particular track, it works in a pinch. It also automatically disables itself whenever you connect either headphones or the line out jack.
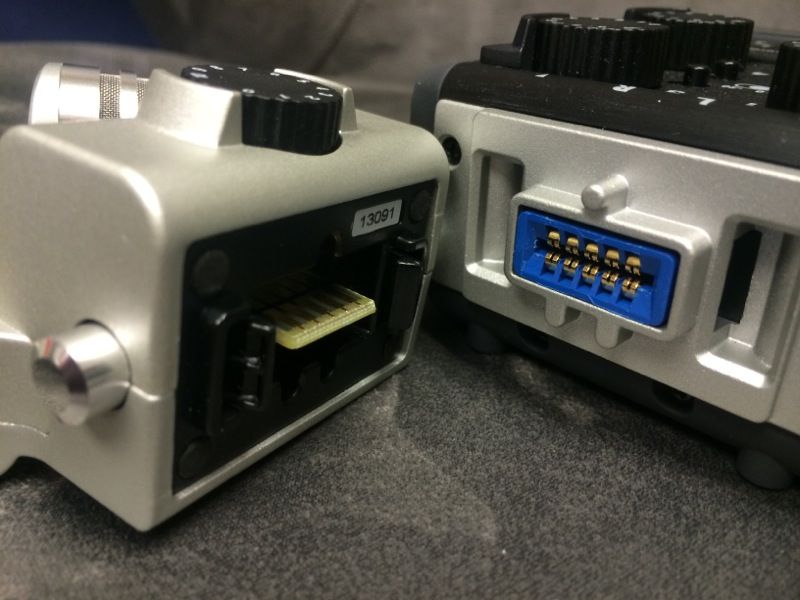
Zoom H6 Microphone Capsules
The Zoom H6 Handy Recorder can be equipped with so many microphones, we can’t imagine any style of recording (save binaural) that you won’t be able to accomplish (we’re still waiting on the head module capsule—it could happen!) With that in mind, I thought a brief tour of WHY you might want to use these mics was in order. This own’t be terribly in-depth, but just gives the basic user an understanding of why these different microphones exist and why you might choose one over another.

Shotgun Microphone Capsule (SGH-6)
Starting with the optional (but very important) SGH-6 shotgun capsule, you get a mono mic that falls into the hyper-directional class (in tech-speak, the SGH-6 employs a super-cardioid polar pattern). This microphone is perfect for news/ENG or film recording applications where you can’t stand right in front of your subject and it’s impractical or impossible to use a lavalier, handheld, or boom microphone. The directionality of this shotgun is achieved through the use of three internal microphones along with special processing to reject unwanted ambient noise to the periphery of the focused target. It does have limits, however. Unlike some larger and longer shotgun mics, if you get much beyond 3-4 feet away the audio began to take on some of the room tone and lose its presence. The SGH-6 comes with a wookie con…it comes with a windscreen that will help eliminate noise during outdoor recordings.
X/Y Microphone Capsule (XYH-6)
You use an X/Y mic when you want a nice ambient sound along with a center-positioned source. It’s kind of like having two mics in one but with a fairly straightforward stereo miking technique that doesn’t require much in the way of complexity or configuration. The XYH-6 X/Y capsule uses a pair of matched cardiod microphones that naturally reject ambient noise from behind or to the sides. The positioning of the microphones is what delivers the nice wide stereo sound, and you can switch between 90 and 120 degrees depending on how wide you want the stereo separation (this works much like the H4n capsule). Zoom claims that the X/Y mics on the H6 use the largest diaphragm (nearly .58″) of any included on a portable recording device.
Mid-Side (MS) Microphone Capsule (MSH-6)
The primary advantage of the MS microphone is that it allows you to literally capture both a stereo and a point source sound and then widen or narrow the soundstage (the stereo image) after the fact. The MSH-6 capsule actually encloses two separate microphones. One is a cardoid mic designed to capture what’s directly in front of the capsule, and the other is a “figure 8” bi-directional mic that is positioned so as to pick up the left and right audio. The recorded signal contains signal from both mics, and subtracting the “mid” mic reduces the width of the stereo image. In this way, you can use the two recorded channels to create either a wider or narrower soundstage or stereo image. It’s wicked cool and something that is a favorite for those who may want to experiment with the width of a recording during live or studio music recording for example.
Need More Inputs?
If you positively have to have more inputs, then the Zoom H6 Handy Recorder can help with that, too. The EXH-6 is an optional capsule that gives you two more XLR/TRS Combo connections, bringing the total recordable tracks to 6 (just keep in mind that only the 4 on-board dual connectors include the ability to apply phantom power). According to Zoom (and we have no reason to disagree), this makes the H6 the smallest self-contained 6-track recorder…period.
Connections, Accessories, and Features
With an optional HS-1 (hot shoe), you can place the H6 on top of a DSLR camera and use it as your audio capturing device. There’s also a remote control with Record, Play and Stop functions, and you can indefinitely power the H6 using a USB-A power supply (also optional). Most of the mics come with a basic windscreen of some sort to prevent noise when recording outdoors. It’s nice touches like these that make the H6 come across as a truly refined and high-end portable recording system. As far as extras and features, the Zoom H6 has plenty_many of which you may never, as a professional, need. Still, they’re there and worth mentioning. Some of the basic features included on the H6 include a built-in metronome and guitar/bass tuner as well as a Pre-Record (continuous pre-roll) and Auto Record (signal-based) function. You won’t want to engage Pre-Record if battery life is a concern since it essentially puts the H6 into continual record mode, automatically saving two seconds in front of the recorded track once you press “Record”. Other features include effects (which you should probably never use), a low-cut filter that may be handy if you encounter AC hum or find yourself near large machinery, and a built-in compressor/limiter.
Recording with the Zoom H6 Handy Recorder
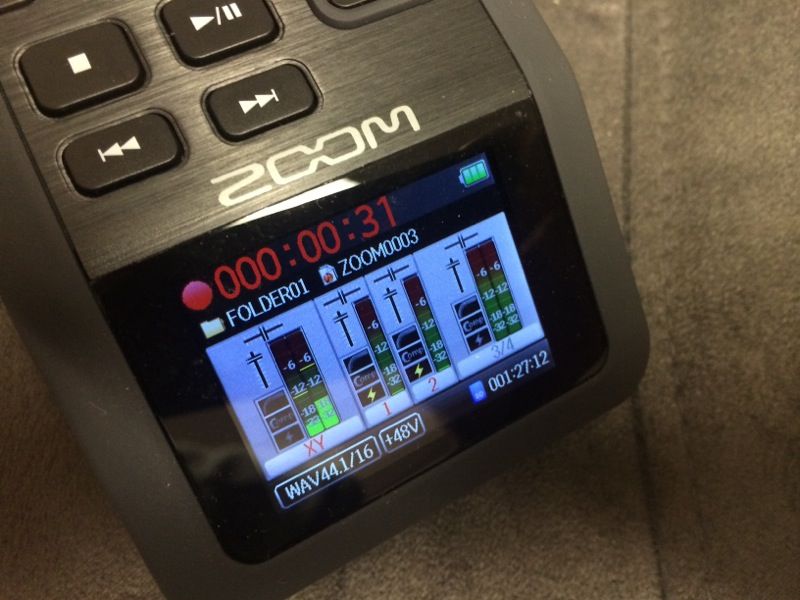
While desktop media players pride themselves on handling every type of file format imaginable, the Zoom H6 records in only two formats: uncompressed (broadcast WAV format compatible) WAV and lossy MP3. It does, however, support a host of options for those formats. For WAV files, the Zoom H6 can record in:
- 44.1kHz / 16-bit
- 44.1kHz / 24-bit
- 48kHz / 16-bit
- 48kHz / 24-bit
- 96kHz / 16-bit
- 96kHz / 24-bit
When using the multitrack functions of the Zoom H6, WAV is all but mandatory as it does not support mono recording of MP3 files (only stereo). After recording the internal mixer can output a final file as either WAV or MP3. Another killer feature of the Zoom H6 is Backup Record. Not only will the recorder lay down a duplicate pair of tracks when you’re recording stereo, it will reduce the input gain automatically by 12 dB. That means that in the event you overdrive the input and distort, the H6 has your back with a pair of tracks that were more conservatively recorded. The on-screen menu allows access and recall of either the main or backup tracks when this function is enabled. I enabled this on several recordings and it seemed to work flawlessly, though I didn’t end up needing it. The H6 uses 4 AA batteries, and a set of alkalines will last you as many as 20 hours. It records to standard SD cards, though SDHC and SDXC are recommended if you’re planning on recording a lot of material at once.
Zoom H6 Handy Recorder Features
- Interchangeable input capsules that can be swapped out as easily as the lens of a camera
- Six-track simultaneous recording
- Four mic/line inputs with XLR/TRS combo connectors
- Gain controls (real knobs!) and -20dB pads for each input
- Phantom power for all main inputs: +12/+24/+48V
- Large full-color LCD display, angled so it’s easy to read in all environments
- Records directly to SD, SDHC and SDXC cards up to 128GB
- Up to 24-bit/96kHz audio in BWF-compliant WAV or a variety of MP3 formats
- Auto-record, Pre-record and Backup-record functions mean that you’ll never miss that perfect take
- Multitrack to stereo internal mixdown
- Independent monitor and playback mixes
- Virtual VU meters
- Voice memo and up to 99 marks per recording
- Overdubbing, up to 99 takes
- Built-in effects, including low-cut filtering, compression and limiting
- Onboard MS decoding
- Normalize, Divide and Trim editing
- Chromatic tuner and metronome
- Loop Playback with user-defined start and stop points
- Variable playback speed, from 50% to 150%
- Variable pitch per track without affecting playback speed
- USB port for data exchange to and from computer
- Multichannel and stereo USB audio interface for PC/Mac/iPad
- Camera strap mounts
- Mounts directly to DSLR or camcorder with optional HS-01 Hot Shoe Mount adapter
- Accepts standard AA alkaline or NiMH rechargeable batteries
- Over 20 hours of operation with 4 AA alkaline batteries

Damn this product line looks sweet! I love the knobs on each additional input device. Bye Bye DR-40 (Tascam)!
No kidding, right? I never thought anything would beat my H4n, but this takes it to a new level.
Pingback: Samson G Track – USB Condenser Mic with Audio Interface (rec Guitar & vocal at once) |
Great review, I’m thinking the Zoom H6 is definitely going to be my next purchase!
Quick question about the backup function though . . . does it record the backup (with the extra 12 db of head room) to the SD Card automatically, effectively giving you two files for each input, or do you have to go into the system after a clipped recording and tell it you want to save the backup instead of the main recording?
Great review!! I finally bought one and impressed on it’s performance.
One question I want to ask is, if I want to use a lavalier mic for interview purpose, which type/brand works with it? I have a Rode Smartlav and pluggged it through the XY module. It doesn’t work and no input signal on the display either. I did it because I want to use the H6 as the main audio recorder. Thank you for the advice in advance.
I’m not sure why that wouldn’t work unless the condenser mic requires more than 2.5V to operate.
I also have the H6 and smartlav and would love to know why it does not work. Was afraid i had a faulty product for a while there, but seeing the above comment at least helped me realise it must be a compatibility issue rather than a fault.
In answer to the questions about the Smartlav. That mic is designed to work with iOS (and Android, I believe) devices and does not work out of the box with industry standard inputs, specifically due to the way it takes its power. Luckily you can buy a small adaptor cable that will enable the mic to use standard plug-in power from any device like the H6 that supplies this.
Rode SC3 3.5mm TRRS to TRS adaptor for smartLav
If you search on the above you should get to the product listed in whatever country you are in.
I bought the H6, almost on a whim, after using a hired one briefly on a shoot. When I saw the price I thought it was too good to be true, which turned out to be the case, a little anyway :-). It’s an impressive piece of kit for the price and I don’t regret my purchase but you should note the following.
The dynamics (limiters, compressors) are in the digital realm so will not help you in any way to reduce input overload distortion. Leave them switched off and adjust your dynamics in post. Just about any compressor in your editing software is likely to be better quality. This was a disappointment to me, I assumed that the existence of this feature was to help with the recording (coming from a pro-audio background), not as a gimmick. It’s better to record too low and increase later than to distort and luckily 24 bit wav files have enough dynamic range that recording low won’t be a problem. On that topic, don’t use the normalise feature! It’s just an extra step and gives you nothing except level. Use a gain stage in your editors dynamics or eq instead, it does the same thing, has more control, doesn’t risk inter-sample distortion in the same way and you’re already adjusting your file so it’s not an extra ‘generation’. In fact, just ignore the ‘effects’ in the zoom. Your audio will appreciate it.
Also, I haven’t found out if the low-cut filters are also post AD and after the nasty surprise with the limiters I’m not making assumptions. If they are digital, the same applies. You can always cut low rumble etc in post and you will have more control and never regret setting the filters too high. If they are instead in the analog realm then ignore this comment, the filters will be a genuinely useful tool, protecting your audio BEFORE it’s been digitised. If anyone knows more about this, let us know.
One final comment. I have been impressed with the quality of the built in mics and preamps. However, consider that you are getting six microphone level preamps and four microphone capsules for around a tenth the price of a single high-quality studio mic. And that’s before you add in the six track recorder, those useless effects and all the other bits. This means that the quality is not going to be premium and my experience supports this. However, it is easily good enough for dialogue, atmos, FX, foley and almost anything else you need to record for putting to images. I’d say that the mic pres are just about good enough to use in a critical music recording scenario if a better mic is used, certainly if the portability and convenience is taken into account. I’ll always use my Summit pre for ‘hero’ vocals and instruments but I woudln’t lose sleep over using the zoom (with a ‘big-boy’ mic plugged in) if I had to.