Setting Up a Blu ray Player
When Blu-ray players first came to market, there were a lot more things to consider with regard to setting them up and configuring them for use in your home theater. There was the resolution, because not all TVs were 1080p and those bulky CRTs and huge rear projection sets were still in vogue. Additionally, HDMI had not yet grown to its current near-ubiquitous levels, and so players were often connected by analogue video outputs to older televisions or AV receivers. Now, setting up a Blu ray player is quite simple. We’ll show you how.
To stay relevant, I’m going to skip some of the antiquated issues and focus on how to set up a modern-day Blu-ray player. That can be accomplished relatively easily, and involves just a handful of steps—many of which are simply checking to make sure certain settings which should be defaulted are indeed set properly.
Step 1: Make Your AV Connections
It may sound basic, but the first thing you want to do when setting up a Blu ray player is make your AV connections. This might sound simplistic, but if you have an older AV receiver then you may need to consider running the HDMI output from the Blu-ray player directly to your HDMI-enabled television and digital audio to your receiver. Since many Blu-ray players are coming with fewer and fewer connections these days, you also want to make sure yours has exactly what you need to make it work on your system. See our article on Connecting a Blu-ray Player for more specific connectivity help and options. The bottom line is you want to get audio to your sound system (or television if you don’t have speakers or a soundbar), and you want to get video to your TV. When both of those needs are satisfied, then you’ll all set to go.
Another item that is often overlooked is Zone 2 audio. If you happen to want audio from the Blu-ray player to be able to reach another zone, most zone-enabled AV receivers require the source to be analogue in nature. That means you may want to connect the analogue stereo RCA outputs of your player to the DVD or Blu-ray analogue audio inputs of your AV receiver. If you do that, be sure to set the AV receiver to use the digital or HDMI audio inputs when that input is selected, so you get the best possible sound. When using Zone 2, however, you’ll now be able to select the Blu-ray player as a source.
Step 2: Don’t Forget to Provide an Internet Connection
Many players now come with wireless connectivity, since that’s so critical for Blu-ray due to the inane and unavoidable copy protection keys that must be updated in the player from time to time. You can run the player without an Internet connection for a time, but eventually you’ll need to take it somewhere you can update it or some of your discs may not play.
Yes, the Blu-ray Disc association is that lame—particularly since these keys were cracked years ago and the whole process is completely senseless.
In any case, providing wireless or wired connectivity just makes navigating those updates all that much simpler. If you have the ability to go wired, I recommend it, especially if your player includes streaming services like Netflix and VUDU. Wireless should be good enough for most streaming, however, so as a fall-back it’s not bad, provided you have adequate signal strength to the player. One caveat, however: Unless you really love BD-Live, that java-based system that provides additional web-based content for certain movies, I recommend turning BD-Live off. It will speed up your player considerably, particular as it pertains to disc load times. You can always re-enable it when desired, but overall I find the feature to be underdeveloped, underused and poorly thought-out.
Step 3: Set Up Your Streaming Services (if applicable)
Since many players come with Netflix, VUDU, Hulu Plus or any of several other streaming media services, setting up a Blu ray player means you also need to go through and set up those accounts. That way you can use the player quickly and easily and access all of your content from a single source. Since Netflix and VUDU include digital surround sound (Dolby Digital Plus) on select content, having the player be your source for that type of content makes a lot of sense. Hulu Plus only streams in stereo, currently, so you’ll want to enable Dolby Pro Logic II mode when you stream from there.
Things You Probably No Longer Need to Worry About
Since most televisions and AV receivers have HDMI now, and Blu-ray Disc players have the correct default settings, there are a lot of things you probably don’t need to worry about. These are items which were important to note in the days when Blu-ray players were new and still trying to figure out how to integrate into systems that may not have been completely up-to-date.
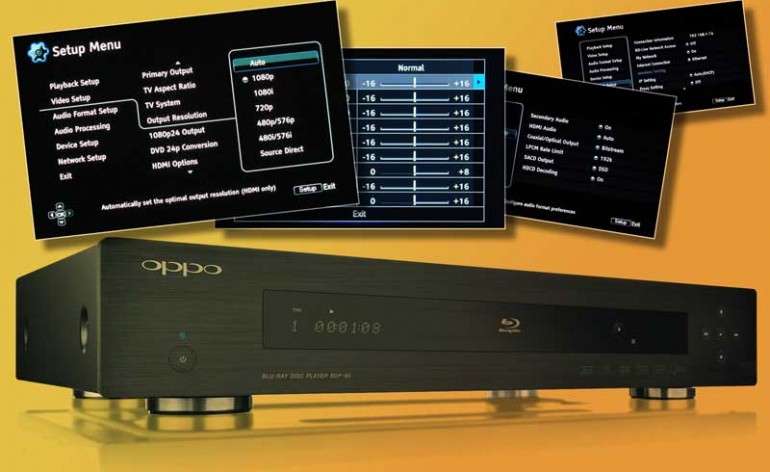
- Setting the Display Resolution
Yes, in days past you had to actually make sure the Blu-ray player was set to the native display resolution of your television. Nowadays, however, you’re more tan likely going to be at 1080p unless you’re running a very old television or picked up an awesome deal somewhere on a smaller or older 720p set. Should you need to worry about resolution, the settings menu should have an area marked “Display” or “Video” where you can double check your settings. Most players are configured to “Auto” and will match the resolution of the display automagically.
- Choosing an Audio Format
Another obsolete setting is the audio format. While you can still opt for PCM output or native output for your player, most systems are defaulted to use the correct output format. Blu-ray Disc players were originally developed to use the analogue outputs and lossless PCM in order to include all of the audio from the disc as well as the top layer of effects and button sounds. Now, they tend to output Dolby TrueHD and DTS-HD Master Audio as lossless master-quality formats which are easily decoded by modern AV receivers.
- HDMI Black Levels
We have found that most players correctly set this to “Low” and thus output the correct black levels for most systems. Oddly enough, the “Standard” or “Normal” settings tend to be the incorrect ones that raise the black levels to more of a dark gray and reduce the dynamic range of the player.
- Speaker Configuration
If your BD player has analogue audio outputs then it may also have a section of the menu dedicated to speaker configuration. What you should understand is that this has NO EFFECT on the HDMI or digital outputs. These settings affect only the analogue outputs of the player. If you are connecting these analogue outputs to an older AV receiver, which doesn’t have bass management (crossover, speaker size, etc) settings for the analogue multichannel audio inputs, then you’ll want to configure these in the BD player.
Conclusion
Bu-ray Disc players have gotten a lot easier to configure in recent years. Gone are the days of having to navigate the menu to ensure everything is properly configured. There were times when we even had to plug some units in via composite video just to see the menu and change the settings to the proper format. That hasn’t happened in a long time and players are now more or less foolproof—which is a good trend that we hope continues as 4K video resolution and advanced video technologies continue to loom around the corner.
Do you have a Blu-ray player horror story you’d like to share with us? If so, drop us a line on Facebook or comment below and join in the discussion.


