Home Theater Receiver Setup Guide
Setting up a home theater receiver is much more complicated than it should be. Manufacturers have largely opted for more features over simplistic use. The result is the advent of powerful home theater receivers that are full of rich, wonderful features that no one understands how to fully set up, configure or operate. To help you simplify the process, we’ve designed this AV receiver setup guide that will give you some step-by-step instructions. Follow these, and you’ll be well on your way to surround sound bliss!
Home Theater Receiver Setup: Physical Connections – Inputs
The first thing you want to do is connect your source components to the appropriate inputs on your receiver. Two things are important here: 1) Use the best cable technology possible, and 2) Know and understand where to plug in your gear. The first item really just means to ensure that, if you can use an HDMI cable, that you do so. An HDMI cable from your Blu-ray player will let you view the actual high definition content contained on the disc, while a composite cable (and now likely, a component cable, will not). Continue plugging in all of your devices until everything has its own input. Note that you likely cannot “double-up” on inputs, so if you have all available HDMI connections filled in for the receiver, adding new inputs to a composite “Blu-ray” input won’t allow you to use it. When Blu-ray is selected, the receiver will simply default to HDMI.
Once you’re done connecting all of your gear, be sure to take notes for later—you’ll need them.
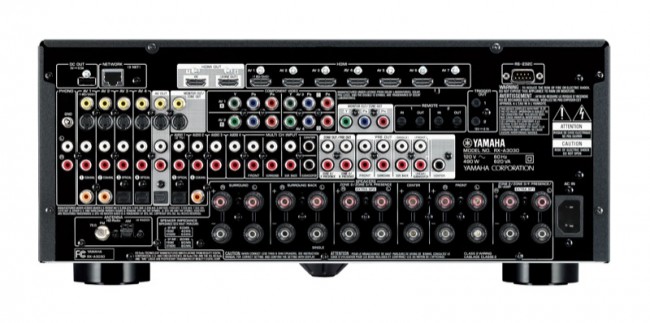
Home Theater Receiver Setup: Physical Connections – Outputs
Once your inputs are all connected, then your outputs are next on the home theater receiver setup checklist. There are only two types of outputs when dealing with an AV receiver: Speaker cables and video (typically HDMI video). Wiring up speakers is simple if you did a good job labeling the cables. The key is making sure you have a solid connection to the binding post without any stray wires that could short across the inputs. For HDMI video, you just want to make sure the cable you are using is adequately spec’d for the distance. An HDMI cable that needs to go 4 feet from the home theater receiver to a flat-panel TV can be made from chewing gum…well, not really, but any cable will work. An HDMI cable that needs to go 40 feet between the walls and ceiling to a projector requires a very precise set of tolerances. It better be high-speed and it better be made well.
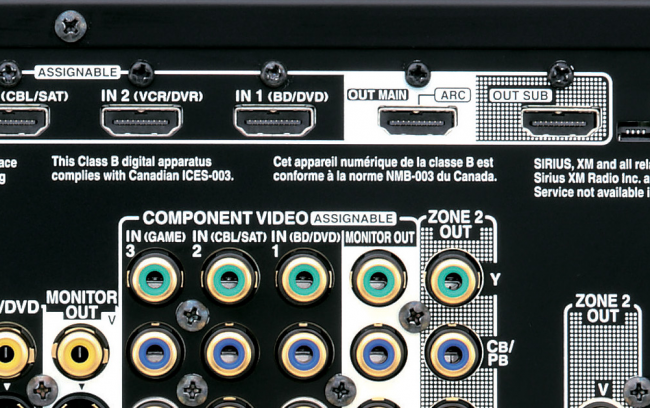
Some home theater receivers have dual HDMI outputs. These are typically for running either the same source to two different displays (like when you have a front projection system with an LCD present behind the screen) and also when you want to run a separate video source to a different room or zone. There are typically limitations involved on each, so be sure to understand the full audio and video capabilities of your surround receiver before you buy one to accomplish a particular task you have in mind.
Optional – Network Settings
Another thing home theater receivers setup guides now need to include are provisions for dealing with network connectivity. These surround receivers may connect to a DLNA source to allow you to stream media from a home computer or server, or they may let you connect to an online source like Spotify to stream music. Whatever the case, you may need to connect an Ethernet cable to your receiver with an active Internet connection. If you don’t have a router nearby (almost no one does) you can either choose to install a network cable drop to that location or even utilize a solution that allows networking over power lines.
Know and/or Name Your Inputs
One of the biggest gripes I have with surround receivers is that, once you have everything connected, it still doesn’t know where anything is. This is especially true of models that feature numbered inputs (HDMI 1, HDMI 2…) instead of named inputs (BD, Sat, DVR…). So, once everything is connected, I used to find that I had to once again go in the back of the receiver to look at what I had done because I didn’t take good notes. With notes in hand, make sure that the proper input is selected as desired and that the proper audio channel is used (HDMI, digital, analogue) for each input. Doing this will ensure you get the correct device (and audio) when you select it via the remote control.
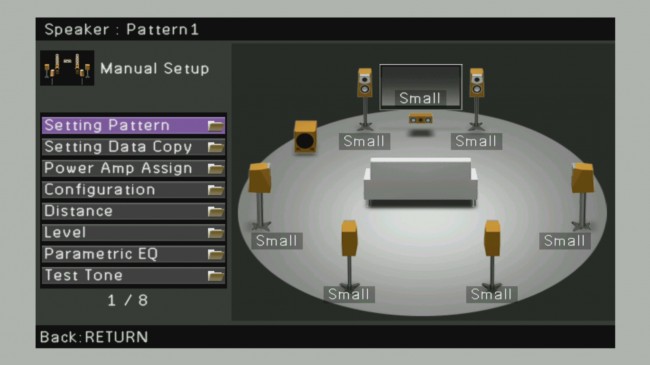
Tell Your Home Theater Receiver About Your Speakers
Just because you connected your speakers doesn’t mean it knows what you have. It should mean that, but most (all?) AV receivers don’t have any idea if there are speakers connected to various inputs or not until they run an auto-setup using an included microphone. To properly configure your receiver, go into the Settings menu and find the section where you can set the speakers to Large, Small or None. Set any unused speakers to None (meaning you didn’t connect them, nor will you in the next few hours). Next, set any speakers that can play all the way down to 20Hz to Large. Seriously, all speakers—no matter how huge you think they are or what you paid—should be set to Small unless they play down to 20Hz. Setting them to Small actually gives you better sound for three reasons:
- Your speakers work more efficiently. Speakers set to Small don’t waste energy receiving and trying to play back signals they can’t—like low-frequency bass information below 30-40Hz.
- Speakers set to Large receive a full-range signal whether they can play them or not. If there are frequencies at 35Hz or lower that your main tower speakers can’t play, those sounds are lost completely.
- Your subwoofer is typically much better and adept at producing lower frequencies than your main speakers. Setting your speakers to Small means that your sub gets to do what it’s good at—play down low.
Home Theater Receiver Setup of Distance & Levels
So you’ve got your connections, the speakers are set up for size and you have your network read (if applicable). The last thing you want to do (for basic setup) is set both the distance and levels for your speakers. A lot of times this can be done with an included microphone, but we also like to use our SPL meter—particularly for the subwoofer, which is much harder to measure and set up automatically. Distance, or Delay, settings let the system properly understand the required signals needed to simulate the space in your home theater room. Surround speakers that are further away from you than your main speakers need to get the correct audio at the correct time so that everything sounds cohesive. This is the goal of Distance Delay settings.
Optional – Connect Network Streaming Accounts
We had you set up a network drop above for receivers that feature network streaming services, however, you still need to connect your accounts. In the Settings menu, find where you can add your account credentials (user name and password) to log in, and you’re all set. After that, in the case of Internet streaming from Spotify or another online service, you’ll be listening to music in no-time-flat.
That’s about it for setting up a home theater receiver. It should really be easier than it is, but, alas, it is not. As new formats and features like Dolby Atmos, 4k, HDR, and more roll out, set up is more likely to get less intuitive, not more.


Is this site still live?…
Having just set up (or tried to) a Yamaha Rx679 system with ceiling speakers, reading this guide was useful. Things I missed are: setting speaker system impedance, challenge in setting up a REL subwoofer ie is both the connection to the main front speakers and the LFE channel the right thing to do for the Yamaha system?