OmniMount OE120IW Ultra Low Profile Mount
Unlike the American waistline, flat screen TVs are getting thinner and thinner every month. With hopes to address this issue in a new way, the OmniMount OE120IW Ultra Low Profile Mount was born. A couple of years ago, two people were needed to mount a 32″ TV. Today, you can practically hold one up with one hand. That said, today’s TVs are now thinner and more svelte than even the mounts they rest upon. Add swivel and telescoping linkage to the mount, and they can be more than twice the TV thickness or more. I often use the following phrase when discussing progress: Whenever you improve something, you usually just move the problem elsewhere. In this case, a flatter TV is achieved, moving the problem to the now unsightly wall mount. It’s a vicious cycle.
OmniMount OE120IW Low Profile Mount—A Visionary Design
The people at OmniMount appear to have anticipated this cycle when they came up with the OmniMount OE120IW Ultra Low Profile Mount for 42″ to 80″ TVs. (By the way, I’ll mention up front that 42″ is a generous low-end size limit—one of the multiple VESA bolt hole patterns matched up with my 32″ television just fine). This mount would really appeal to anyone who is clutter- and equipment-phobic. While this fear typically affects women, I know a growing number of men who prefer a clean look, especially when the “guts” of a system aren’t necessarily show worthy. While you can certainly mount your display to a wall using a fixed flat panel TV mount and use a cable management system to hide the cables, the OE120IW presents a more sophisticated solution.
There was a VESA bolt pattern for my 32″ TV even though the mount is advertised as being designed for 42″ to 80″ televisions
What’s in the Box
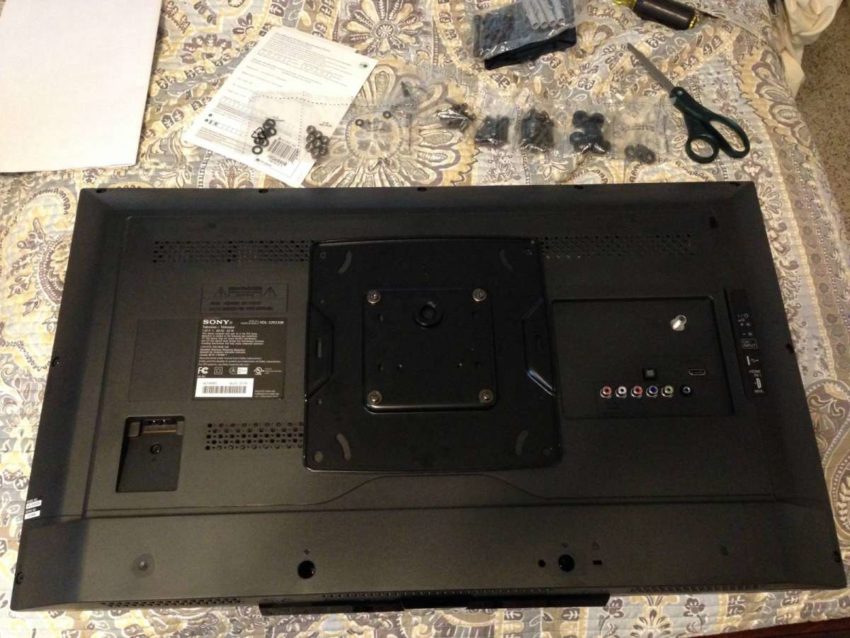
We got our first look at the OmniMount OE120IW as part of our CEDIA 2014 Expo show coverage. Unpacking the OmniMount OE120IW recessed in-wall flat panel TV mount was easy, and all of the requisite supplies were included such as screws, bolts, cable straps, instructions and a wall cutting template. The in-wall portion of the mount is made of a heavy gauge metal which reminded me of a wall safe. It’s very sturdy and surprisingly heavier than I expected. At this point, I knew the mounting system that anchored it to the wall would be comprised of more than simple wall anchors. Heavy lag bolts were supplied which, again, were more ample than I expected. In spite of the numerous DIY projects I’ve completed in my life, including down-to-the-studs remodels of kitchens and bathrooms, I was feeling a little intimidated with this particular installation. Looking back, I think it was because this OmniMount flat panel mounting system is the first of its kind, and I was literally one of a limited few consumers who had ever installed it in their home. What if it didn’t fit properly? What if I didn’t read the instructions correctly? What if the hole was too big, or worse, what if my wife expressed doubt in my ability to complete the task?
Going All-in
Ultimately, my fear of the unknown was abated by the fact that I made a very known commitment to get this unit installed. I also made sure that I did this when my wife was out running errands. The review would now include not only how the mount functioned, but also how well the instructions guided me to a (hopefully) positive result. As shown above, the mounting of the OmniMount OE120IW Ultra Low Profile Mount plate to my TV was simple. Now on to the wall.
Cutting a hole in a wall always requires the location of studs. Most interior wall studs are on 16″ center distance from each other. Using a stud finder, I found the studs and marked them as recommended. Lag bolts will go into the studs, so using the template, I set the template to the hole – stud position. The template mounts with double sided tape which held well. Using a pencil to trace the cut lines was easy and after checking multiple times that all was in good order, I cut the drywall.
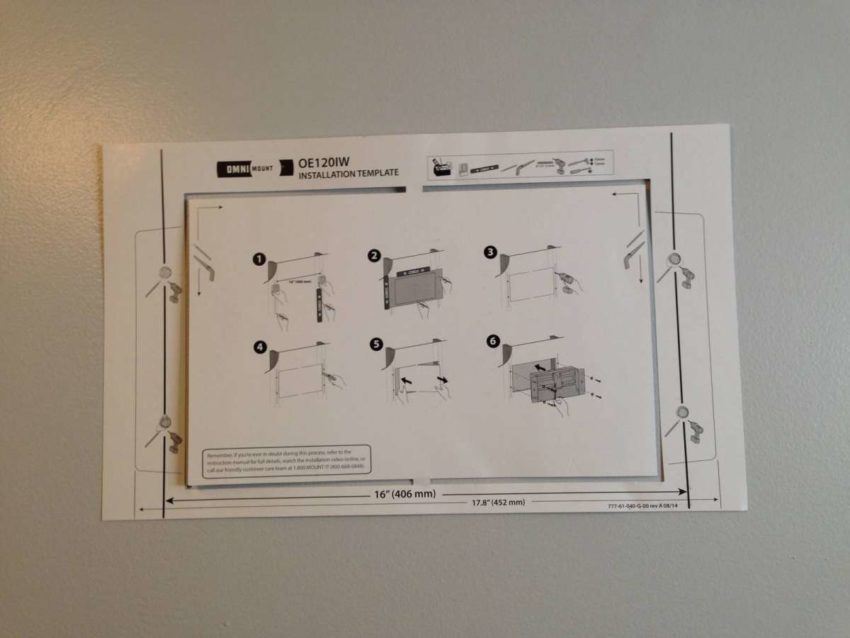
The provided template is very useful. Be sure to follow all directions as they are well written and efficient.
A few tips when cutting drywall: 1) Use a drywall or “keyhole” saw which is manual, but keeps dust to a minimum, 2) Use a vacuum at the cutting edge to collect as much dust as possible to minimize the dust cloud, 3) Be sure there are no wires in the space you are cutting. If there are, you can still cut, but make sure you go slow and shallow to avoid hitting wires. Ease or difficulty will depend greatly on either scenario. If you’re really concerned with hitting wires you can opt for a traditional razor knife, or use one of the many drywall rotary cutting tools on the market with an adjustable depth setting. This is the same, or at least similar, process you’d use when installing surround sound speakers in your ceiling.
Features of the OmniMount OE120IW mount include:
- Complete in wall box system with pre-installed wall mount
- Makes in-wall wiring feasible without an electrician
- Recessed in-wall mount gives a low profile finish with the flexibility of full motion
- Small and compact
- Ample cable management included
- Mount system takes the guesswork out of matching an in-wall box with compatible wall mount
- Works with OmniMount power accessory kit or off the shelf electrical components
- Post-installation leveling accounts for uneven walls or floors
- Full motion with left and right pan (great for rooms with multiple viewing areas)
- Extremely low profile design
- Extruded aluminum arms for superior finish
- Elegant arm design looks beautiful when TV is pulled away from the wall
- Materials and finishing give it an expensive, high end look
- UL 2442 rated and tested to 6000 cycles
- Special channel routes cables from TV to wall, concealing wires
- Equipped with patented gravity tilt, providing perfect tension no matter where you place your TV
- TV tilts forward to reduce screen glare (great for rooms with windows)
All Clear!
Once the hole was cut, my anxiety subsided faster than if I had popped a Xanax. The template proved to be spot on, which depended heavily on proper stud location. Fortunately, there is some fudge factor (read dimensional stack up tolerance) in the template and box design. With a slight nudge, push, and tilt, the OmniMount OE120IW Ultra Low Profile Mount went into the opening.
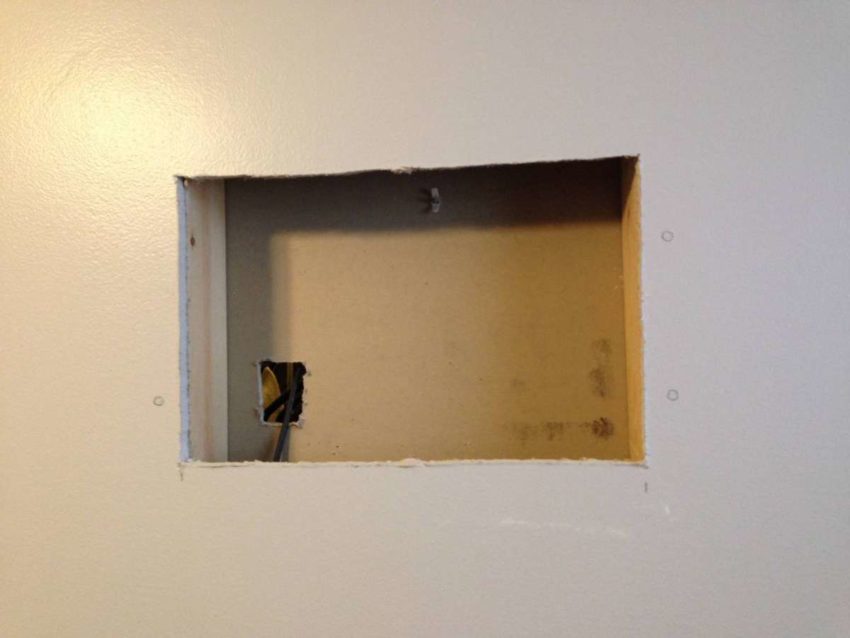
The hole in the drywall after proper cutting using the provided template. Lag bolt holes are pre-marked on either side of the hole. Pre-drilling is required. Please note the hole in the bottom left corner is a previous installation and not part of this system installation.
Pre-drilling the lag bolt holes was easy and forgiving. Installing the lag bolts was also a simple process, but you’d better be ready for ratchet wrist at the end as the lag bolts are pretty long and sung (I don’t recommend a power tool for this unless you’re experienced and or confident with the alignment—plus, impact drivers tend to snap the heads off these lag screws quite easily).

Front view of the mount in position. In my opinion, there is too much excess space above and below the box as shown. I’m not sure why this is provided via the template, but the snap-on frame covers all gaps and imperfections (shown later).
Going Fishing
Depending on your wiring plan and access, you may need to purchase the optional OPK2 Power Accessory Kit for in-wall wiring. In my case, I have access on the opposite side of the wall, so I fished my wires through to the other side where my components and services were located. The wiring pathways, grommets, and covers are all provided and well thought-out. This procedure is best to be thought through in advance before pulling wires. There is a particular order to assemble all the features to ensure covers and such are in proper position for final snap-in. While there are a couple of broad-faced velcro wire wraps included, I recommend having some additional small black cable ties handy to better manage wire slack.
Make sure you snap on the finish frame before hanging the TV!
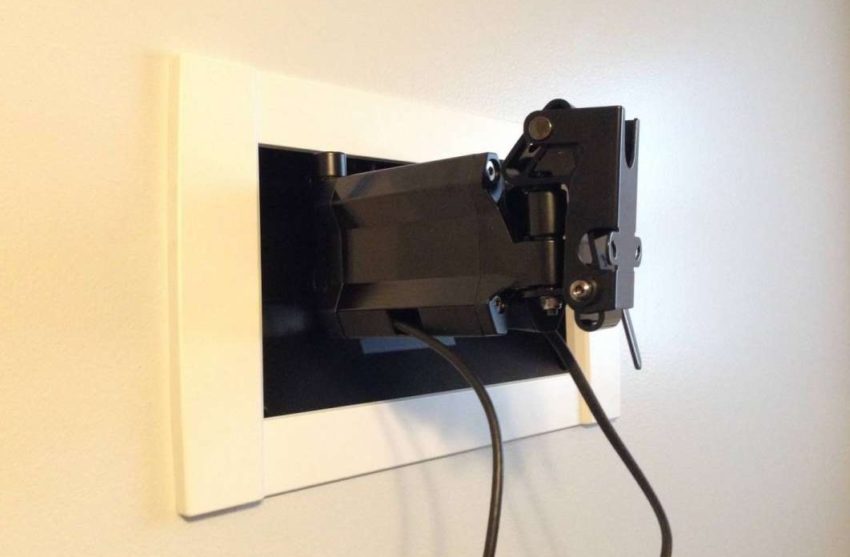
With the TV mounting plate already attached and the finish frame in position (remember, you need to install the paintable frame before hanging the TV!), I was ready to suspend it on the articulating arm. While my previous mounting experiences were a little nerve wracking (i.e. Would this thing hold my TV or simply pull out of the wall?), I was feeling highly confident that the OmniMount OE120IW Ultra Low Profile Mount would have NO problems. The single point male-female slot worked great. With the TV on board, it was a good time to figure out the best wire connection points to establish the most low profile look. In my case, the HDMI cable was previously at the back of the TV at HDMI2, but I now placed it on the side in the HDMI1 input.
I chose to complete the final wiring connections and wire tie down steps, followed by the final two screw installation to lock the TV in a straight and level position.

The patented gravity tilt feature is as easy as adjusting a desktop computer monitor.
Final Adjustments of the OmniMount OE120IW Low Profile Mount
The only adjustment I decided to set and forget was the viewing angle. The OmniMount OE120IW Ultra Low Profile Mount has a patented gravity tilt feature which made the angle adjustment really easy. Unlike some tilt hardware, the gravity tilt hardware prevents the TV from slamming one way or the other when the lock is released. Moving the TV to face more up or down is as easy as positioning a desktop computer monitor. Since I made this adjustment, I haven’t touched it again. The articulating arm is a bit stiff and requires some effort to pull out and push back in. With regular “exercising” of the arm, it appears to be getting easier as it breaks in. There are no obvious user accessible tension adjustments.
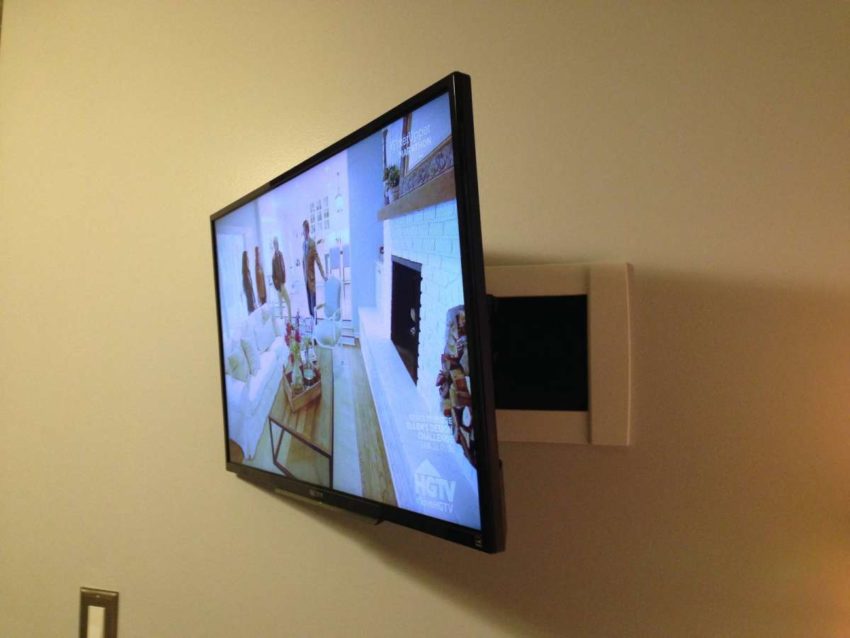
TV in full extension and angled to the left.
Final Thoughts
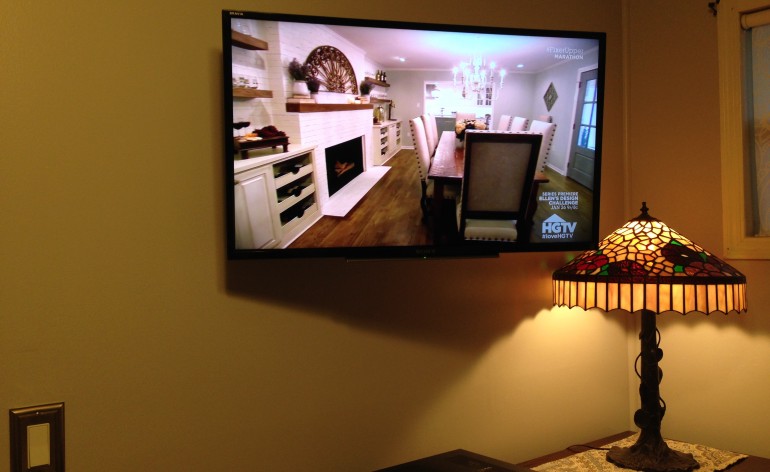
I’ll start with my wife’s opinion. The fact that she wanted to show it off to a couple of friends is a huge testimony of the fit, finish and function of this device. While we do have a dedicated home theater, which she is as equally proud of as I am, she is not typically enthusiastic about this type of techie stuff. Further, the couple she showed it to were impressed as well. I particularly like that the OmniMount OE120IW Ultra Low Profile Mount anticipates most everything an installer and end user will need. As mentioned above, this project was a little intimidating as no one had yet been where no man had gone before. (Say that three times fast!) I’m proud to say that the journey has been successfully completed, and I can easily recommend this system for both its features and ease of installation for the “confident DIYer” as OmniMount puts it.
The OE120IW and power accessory kit will both be on the market in the 4th quarter. MSRP for the OE120IW mount is $349.95, and the optional power accessory kit (to let you safely run power and A/V cables to the mount from an available electrical outlet) will retail for $99.95.


